Instances
Instances control the devices. Each Instance has a specific scheduler type. Instances can have multiple devices asigned to it.
Create a new Instance
- Open RDM in the Webbrowser and login as admin
- Go to Dashboard -> Instances and click “Add New Instance”
- Scheduler Types:
Circle PokemonScans for Pokemon (Nearby) at exactly the coords specified- Name: A unique name of the Instance
- Timezone offset: Not used
- Min Level: Minimum worker level
- Max Level: Maximum worker level
- Scan Area: List of Lat,Lon that the worker will teleport to to scan for Pokemon.
- Notes: The worker will stay at each location for approximately 20 seconds and then move on to the next lat,lon
Circle RaidScans for Raids at exactly the coords specified- Name: A unique name of the Instance
- Timezone offset: Not used
- Min Level: Minimum worker level
- Max Level: Maximum worker level
- Scan Area: List of Lat,Lon that the worker will teleport to to scan for Raids.
- Notes: The worker will stay at each location for approximately 10 seconda and then move on to the next lat,lon
Auto QuestScans all pokestops in the geofence for quests- Name: A unique name of the Instance
- Timezone offset: Your timezone offset from GMT in seconds. (ie. if you are GMT-8 do -8*3600=-28800). This is used to auto clear your database quests at midnight local time.
- Min Level: Minimum worker level
- Max Level: Maximum worker level
- Scan Area: This scheduler type requires your database to be populated with pokestops already and then uses geofences to pull the pokestops. Geofences should be populated like
- Notes: You can use multiple geofences for this instance.
Pokemon IVScans pokemon for IV’s- Name: A unique name of the Instance
- Timezone offset: Not used
- Min Level: Minimum worker level (You probably want this set to 30)
- Max Level: Maximum worker level (You probably want this set to 40)
- Scan Area: This instance uses geofences like above.
- Pokemon IDs: List from highest priority to lowest of the pokemon you want to scan for IVs.
- Notes: Put the highest priority IDs at the beginning, things like Tyranitar, Dragonite, etc. but also put other IDs after so the IV workers are always working. If a high priority pokemon spawns it will jump to the top of the list.
- Save the Instance
- Start the Device Controler for that device one
- Go to Dashboard -> Devices and click “Asign Instance” for that new device
- Select the instance and click “Assign”
- Your device should now start scanning
Scan Area Examples
Geofence Example: (for Auto Quest and Pokemon IV)
[Geofence 1]
48.3515038749951,-123.4311030273437
48.2711288926114,-123.4489558105469
48.2125948327425,-123.3569453125
48.2775269919901,-123.1619379882812
48.3451150449351,-123.258068359375
[Geofence 2]
48.3861721206049,-122.7980158691406
48.2802687893262,-122.818615234375
48.333247949859,-122.9449580078125
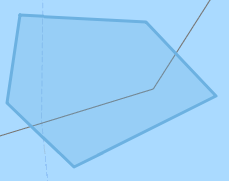
Geofence 1
Geofence 2
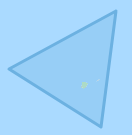
Circle List Example: (for Circle Pokemon and Circle Raids)
32.30280417394316,-64.78238582611085
32.30287672107444,-64.77191448211671
32.2958756553048,-64.78732109069826
32.296165865665564,-64.77667808532716
32.30229634239795,-64.79234218597414
Circle List